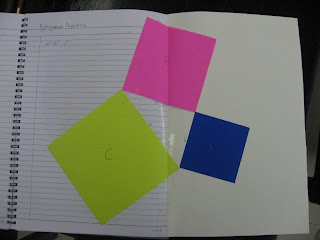
Our lesson in squares was one I had been looking forward to teaching for awhile having gleaned some lovely ideas from many creative mums! Today's lesson was inspired mostly by Child's Play. She blogs about their creative math club and the ideas are wonderful.
I managed to purchase a whole bunch of these square papers from Popular bookstore but you could probably cut your own supply easily enough with a good quality paper cutter. I let the girls play the squares for a while and then we chatted about what they understood about the properties of a square.
These were the points that were made:
- they have four straight sides
- they are equal in length
- they have four right angles
I then introduced the term Quadrilateral. What is that? A four sided shape with four vertices or corners. The square is a regular quadrilateral where all the sides and angles are equal.
This led to a discussion about other quadrilaterals like a parallelogram, trapezium, rhombus and rectangle. This site has some nice simple definitions of each of these. I then pointed out that the square was cool because it could be lots of other things too like a parallelogram, a rectangle, a rhombus and a trapezium. We went through the properties of each of these shapes to understand how that would be the case.
With their paper squares, I asked them to make the smallest square they could. They made it with 1 square. Then I asked them to make the next smallest square, they used 4 squares to make that. I pointed out that numbers that can form a square when put together in a grid are "square numbers". We followed this thought with the next two set of squares. 9 Squares and 16 squares.
I then pointed out looking at the grid of squares, that in order to make a square of 4, you needed 2 squares x 2 squares. With a square of 9, you needed 3 squares x 3 squares and with 16 squares, you needed 4 squares x 4 squares. I showed them that they could write it as 12, 22, 32 and so on. This was the short way of say 1x1, 2x2 and 3x3.
At this point I introduced the concept of square roots. I asked them to look at the side of square of 4 and see how many square there were - there are two. Then as I drew the diagram
I had them write the notation down by each square as seen in the picture above.
Take the square of 4 for example.
- How many squares are there? - 4
- How many squares across and down? - 2x2
- What is another way to write this? - 22
- What is 2 the square root of? -
After they had done this, I set them the task of finding a sequence of 3 numbers where the square of that number plus the square of the next number equals the next number squared. They took a little time and came up with 3,4 and 5 as the only sequential numbers that would add up.
I then gave them 3 squares cut to exact size - 3inches, 4 inches and 5 inches and told them to construct a triangle with those pieces of paper. It was a right triangle.
It was at this point, to my absolute delight, my oldest went "Oh I know what this is, it is Pythagoras' triangle!" How did she know this? The day before, in preparation for the lesson I had read "What's your angle Pythagoras?" by Julie Ellis and she had made the connection from what we had read about his discovery and the exercise we were doing. She had discovered the concept!
So we were able to see that whenever we have a right angled triangle, we can always apply the Pythagorean theorem which was the sum of the areas of a and b (in their diagram above) was the sum of the area of c or more commonly written as  .
.
We finished off with the visual aid of a 12 foot string which was marked off at every foot. I asked how we could make a right angled triangle and they divided the rope into 3 feet, 4 feet and 5 feet and then joined it and voila! We had a right angled triangle!
I ended our lesson by watching this video from How Stuff Works. Some of the Math was beyond them (and me!) but it was helpful to see how this formula might be used in real life scenarios.
Next time we'll tackle Geometrical Solids.


No comments:
Post a Comment